![[Header Picture]](/~zwhite/pics/titlebackground.jpg)
![[Toothbrush Picture]](/~zwhite/pics/cell_tower.jpg)
![[Egeria Picture]](/~zwhite/pics/sam_and_rats.jpg)
![[Jetta Picture]](/~zwhite/pics/jettaradioandshiftknob.jpg)
![[TNC Picture]](/~zwhite/pics/tnc-x.jpg)
This is part one of a (hopefully) multi-part series on organizing a typical geek's music collection. This part provides some background and discusses ripping a CD collection using modern tools.
A few months ago I picked up a NAS (A Thecus N5200 Pro) and some drives for it. I now have a total of 2.8TB of fast, reliable storage.
Since then I have been collecting up my data and trying to organize it all into one place so I don't have to remember which of the 5 bare hard drives has what I'm looking for on it.
Part of this process is getting my music in order. Over the years I've built different collections of music from a variety of sources. I now have 3 or 4 collections of music with a ton of overlap of varying qualities. In all I have some 50gb of music laying around with maybe 20gb of that being unique.
The first part of wrangling some order out of this mess is to start with a collection of high quality (in terms of audio quality) files ripped from CD. Like most geeks I've gone through the pain of ripping these in the past, but I've been inconsistent in terms of format and quality. By reripping all of my CD's I not only take advantage of the higher quality of newer music formats (like AAC) but I can use encoders that are better than what I originally used.
I'm going to assume that you're using iTunes for this. I use iTunes because I'm an Apple whore. ;) There are other programs that do (almost) everything iTunes does, but I don't use them.
The first thing you have to decide on is which format you're going to rip in and what your bitrate will be. If you're using iTunes, you basically get to choose from MP3, AAC and Apple Lossless. If you want the best possible quality and don't mind using up 300mb per 45 minutes of music, choose Apple Lossless and move on to the next section.
Finding that 300mb per album number hard to swallow? So was I. Let's look at the choice most people will make: AAC or MP3?
Everyone knows what MP3s are. They're the standard format in the industry. Everything can play them, including the iPod. The abilities and limitations of the format are well known.
A lot of people are confused about AAC files, and think they're tied to Apple somehow. Additionally, they're often unclear about why you would want to use AAC and why iTunes defaults to this format.
AAC stands for Advanced Audio Coding and it was designed to be the successor to MP3. It's part of the MPEG2 and MPEG4 standards and is actually used by heavily by both Apple and Sony (I just lost the last two anti-apple fan boys still reading this. ;)
The bottom line is that for the same audio quality AAC files will be smaller than MP3 files. On top of that AAC files have more features and ultimately it's the format everyone will move to. I highly recommend using AAC for all your new music rips, even if it means you have to transcode some of your collection to MP3 for certain devices (covered in a possible future article.)
This leaves the question of bitrate. For bitrate you have two basic choices, and it comes down to how much of an audiophile you think you are.
In both cases we'll be setting custom settings, so open up iTunes Preferences —> General —> Import Settings. Choose your Encoder (AAC or MP3) and then select the "Custom..." option from Setting.
First, the audiophile settings. For this we want to ensure that we use the highest possible bitrate at all times and the best sampling rate. First, ensure that "Use Variable Bit Rate Encoding (VBR)" is unchecked. Set "Sample Rate" to "48.000 kHz" and "Stereo Bit Rate" to the highest setting, which is currently 320 kbps.
This will still result in larger files than most people want, for very little (if any) perceptible gain in quality. Most people will want to use VBR to reduce the size of their file.
The idea behind VBR is that you don't always need the full bitrate for every part of the music. The higher bitrates allow you to capture more of the high pitched part of the music. This is especially important for hearing the flutes and piccolos in a symphonic piece or the cymbals and high hats in jazz. However, when these instruments aren't playing that higher bitrate increases size for no quality gain. You can often produce the exact same waveform with a lower bitrate.
When you check the VBR box, you'll notice that you can't select as many bitrates as you could before. This is because instead of specifying an absolute bitrate, you specify a target average. When you specify that you want 192k VBR files, you're saying that you want it range from approximately 128k - 256k.
For most people 192k AAC is fine. If you're using MP3 you want to step up to 256k to make up for MP3's deficiencies. I have a lot of symphonic music in my collection so I choose to use 256k AAC VBR.
I also leave Sample Rate at Auto, because CD's have a 44.1k sample rate so the higher rate doesn't gain much except a little bit of insurance against misreads.
While you're here, be sure that "Use Error Correction" is checked. It may be faster to import without, but you'll pay for it with glitches in your music.
Now that we have our format and quality settings worked out we move on to workflow. Unfortunately the CDDB database suffers from a quality problem. It saves a lot of time, but often you have to correct the genre and sometimes the artist. The other problem is that sometimes tracks are meant to be listened to back-to-back, which doesn't work well if you ever use the random/shuffle feature.
This means that we need to set iTunes to "Show CD" on insert, rather than automatically importing. Most of the time we need only set the Genre, but this is still a very important step, even if you don't think you'll use it (trust me, you will.)
Another thing you might have to do is join tracks. For example, Pink Floyd's Dark Side of the Moon has "Brain Damage" and "Eclipse," which flow into each other and are almost always played back-to-back. By joining them you'll end up with a single file containing both songs, and no gap.
To join tracks select two adjacent tracks and go to Advanced —> Join CD Tracks.
My CD's had been scattered around all over the place. Some were in cases, some were in CD folders, and some were stacked on spindles. Additionally, a lot of them weren't very clean. The first thing I did was to collect them all into one place. I had a 100 disc spool I could easily empty, so that became my "Done" spool.
Tip: When stacking CD's on a spool, alternate which side is up so you always have label against label, and data against data. This will help prevent scratching.
The first task was to sort through all the CD's. Any CDR's got put straight onto the Done spool. Since most of my burned CD's were burned from MP3s I don't want to accidentally put low-quality music into what is supposed to be a high-quality archive. A couple 3" CD's provide an easy to find gap in the spool should I need them later.
After that I had a stack of CD's ready to import. I looked at each disc first, and if it was dirty and/or scratched I took some windex and a clean microfiber cloth to it. Make sure you use a microfiber cloth because paper products are too rough.
For really bad cases I had to hold the disc under the hot water tap (as hot as you can stand, but not as hot as it will go.) Rinse for a few seconds, scrub using your microfiber cloth with circular motions, repeat until clean.
For discs that are scratched and can't be fixed through cleaning you can use a glass or plastic polish to clean them. See instructables or ehow for instructions.
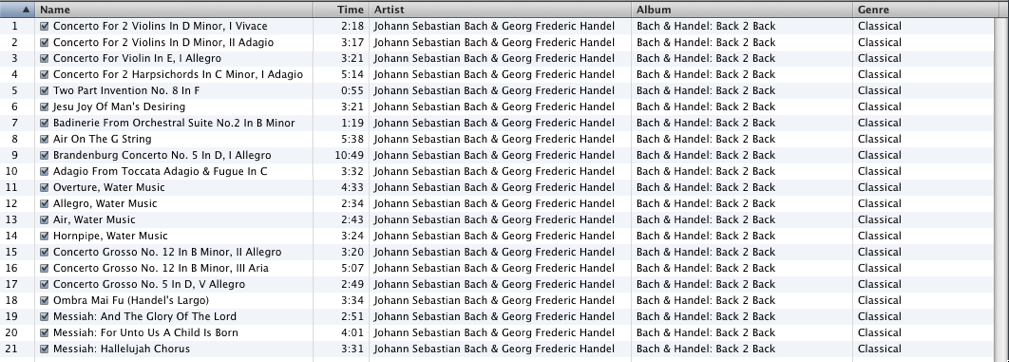
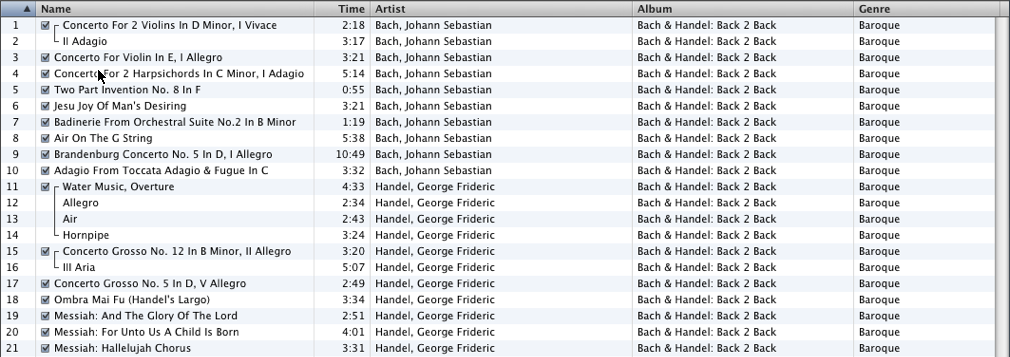
If you are ripping symphony pieces you have a little extra work for each CD. Most of these discs are inconsistently tagged in CDDB. I find that on most discs I have to set the genre (I like tagging mine with the period it was written) and the Artist (Conductor / Symphony if known, Composer otherwise) and I usually have to remove the redundant portion from the titles of joined tracks.
I like to join the different movements of each piece into one track. This allows me to use shuffle for variety without compromising the listening experience. However, iTunes simply concatenates the names of each track, so I often have to fix the names. I find it's easiest to do this before importing, by removing the redundant portion of the name from all but the first joined track.
I've created screenshots showing a CD before and after fixing the tags and joining movements. This part is purely a matter of personal taste, but the better you do at consistently tagging your music now the easier it will be later when you're trying to figure out what to listen to.
posted at: 2008 Nov 02 22:10 UTC | category: tech | (story link)
Copyright © 2006-2008 Zach White